Vue Router 란
‘Vue 라우터는 Vue.js (opens new window)의 공식 라우터이며,
Vue.js를 사용한 싱글 페이지 앱(SPA)을 쉽게 만들 수 있도록 Vue.js의 코어와 긴밀히 통합되어 있다.’
라고 공식문서에 설명되어있다.
싱글 페이지 앱(SPA)는 최초에 한번 페이지를 로드하고 이후부터는 특정 부분만 변경하여 페이지를 보여주는 방식이다.
기존의 웹 서비스는 서버로부터 데이터가 변경 및 페이지를 이동 할 때 화면 전체를 렌더링 하는 방식이였다.
SPA를 사용함으로써 전체 페이지를 렌더링하는데 드는 오버헤드가 줄어들어 앱의 속도가 향상되어 더 빠른 속도를 사용자에게 제공할 수 있다.
즉, Vue Router를 사용하면 싱글 페이지 앱(SPA)을 만드는 데 필요한 URL 이동 및 특정 부분의 변경을 간단히 구현할 수 있다.
Vue Router 사용하기
1. 설치
두 가지 방법으로 사용할 수 있다.
<script src="/path/vue.js"></script>
<script src="/path/vue-router.js"></script>
CDN 링크를 통해 추가하는 방법.
1
npm install vue-router
npm을 통해 프로젝트에 설치하는 방법.
모듈 시스템을 이용할 경우 아래와 같이 명시적으로 라우터를 추가해야한다.
1
2
3
4
import Vue from 'vue'
import VueRouter from 'vue-router'

Vue.use(VueRouter)
2. router 설정하기
vue-cli 를 통해 뷰 프로젝트를 생성했다면 아래와 같은 구조일 것이다.

라우트 객체 생성 및 라우트 인스턴스 생성
1
2
3
4
5
6
7
8
9
10
11
12
// src폴더의 main.js
import Vue from 'vue'
import App from './App.vue'
import router from './router/index.js'

Vue.config.productionTip = false

new Vue({
  router,
  render: h => h(App),
}).$mount('#app')
1
2
3
4
5
6
7
8
9
10
11
12
13
14
15
16
17
18
19
20
21
22
23
24
25
26
27
28
29
30
31
32
33
34
35
36
37
38
39
40
41
// src폴더의 router 폴더 생성하고 index.js을 생성.

// 0. NPM으로 설치했을 경우
import Vue from 'vue'
import VueRouter from 'vue-router'

Vue.use(VueRouter)

// 1-1. 라우트 컴포넌트를 정의.
// 아래 내용들은 다른 파일로부터 가져올 수 있다.
// ex :
// import templateName from '파일 위치'
// const Foo = templateName

// 기존의 만들어진 컴포넌트를 가져와보자 !
import HelloWorld from '../components/HelloWorld'

// 1-2. 라우트를 정의.
// 각 라우트는 반드시 컴포넌트와 매핑되어야 한다.
// 실제 컴포넌트 생성자이거나 컴포넌트 옵션 객체이다.
const routes = [
    { path: '/', component: HelloWorld }
]

// 1-3. `routes` 옵션과 함께 router 인스턴스를 만들기.
const router = new VueRouter({
  routes // `routes: routes`의 줄임
})

// 1-4. 루트 인스턴스를 만들고 mount 하기.
// router와 router 옵션을 전체 앱에 주입한다.
//
// const app = new Vue({
//   router
// }).$mount('#app')
//
// 라고 공식문서에 나와있지만
// main.js 에 import 가져오기 때문에 export로 내보내줘야한다.
// const app 부분을 전체 삭제하고 아래 코드를 추가한다.
export default router
<!-- router를 호출할 app.vue 페이지도 수정한다. -->
<template>
  <div id="app">
    <!-- <img alt="Vue logo" src="./assets/logo.png">
    <HelloWorld msg="Welcome to Your Vue.js App"/> -->
    <!-- 1. 라우터 view를 호출한다. -->
    <router-view />
  </div>
</template>

<script>
// 2. 불필요한 HelloWorld는 삭제한다.
// 삭제하지 않으면 에러가 날 수 있다.
// import HelloWorld from './components/HelloWorld.vue'

export default {
  name: 'App',
  // components: {
  //   HelloWorld
  // }
}
</script>

<style>
#app {
  font-family: Avenir, Helvetica, Arial, sans-serif;
  -webkit-font-smoothing: antialiased;
  -moz-osx-font-smoothing: grayscale;
  text-align: center;
  color: #2c3e50;
  margin-top: 60px;
}
</style>
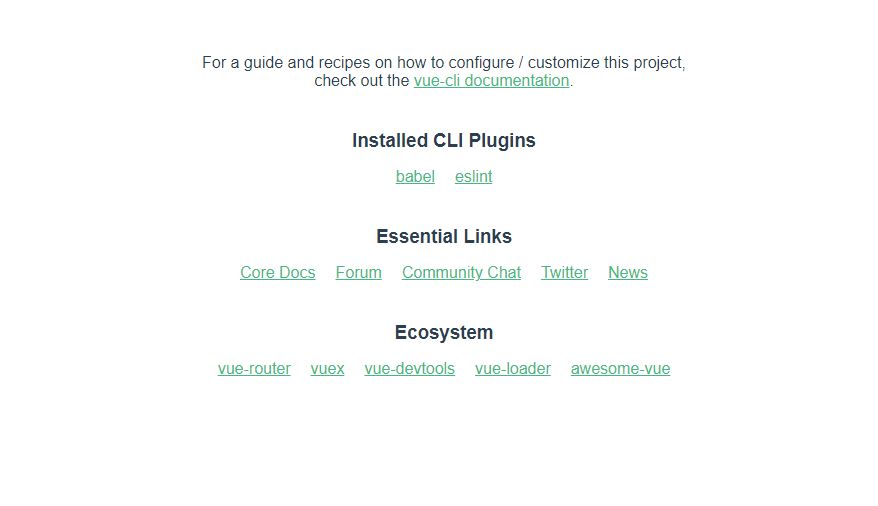
이후 vue 프로젝트를 실행하면 아래와 같이 뜨는 것을 확인할 수 있다.
3. router-link 사용하기
router-link를 통하여 라우터를 컴포넌트를 이동할 수 있다.
<!-- app.vue 페이지에 router-link를 추가한다. -->
<template>
  <div id="app">
    <!-- 1. 라우터 view를 호출한다. -->
    <router-link to="/"> main 컴포넌트로 이동</router-link>
    <router-link to="/test"> test 컴포넌트로 이동 </router-link>
    <hr>
    <!-- <img alt="Vue logo" src="./assets/logo.png">
    <HelloWorld msg="Welcome to Your Vue.js App"/> -->
    <router-view />
  </div>
</template>

...
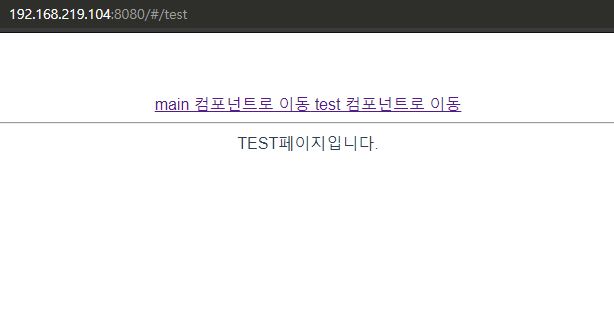
router-link를 통하여 test라는 컴포넌트로 이동해준다고 코딩하였다.
따라서 라우터에서 test 컴포넌트를 연결시켜주어야하며,
component폴더에서 test 컴포넌트 또한 생성해줘야한다.
<!-- src > components > Test.vue -->
<template>
    <div>
        TEST페이지입니다.
    </div>
</template>

<script>
export default {
  name: 'Test'
}
</script>

<style scoped>
</style>
1
2
3
4
5
6
7
8
9
10
11
12
13
14
15
16
17
18
19
// src > router > index.js.

...

import HelloWorld from '../components/HelloWorld'
// 2-1. 새로 test로 만든 컴포넌트를 가져온다.
import Test from '../components/Test'

// 1-2. 라우트를 정의.
// 각 라우트는 반드시 컴포넌트와 매핑되어야 한다.
// 실제 컴포넌트 생성자이거나 컴포넌트 옵션 객체이다.
const routes = [
    // 2-2. 라우트도 정의해준다.
    { path: '/', component: HelloWorld },
    { path: '/test', component: Test }
]

...
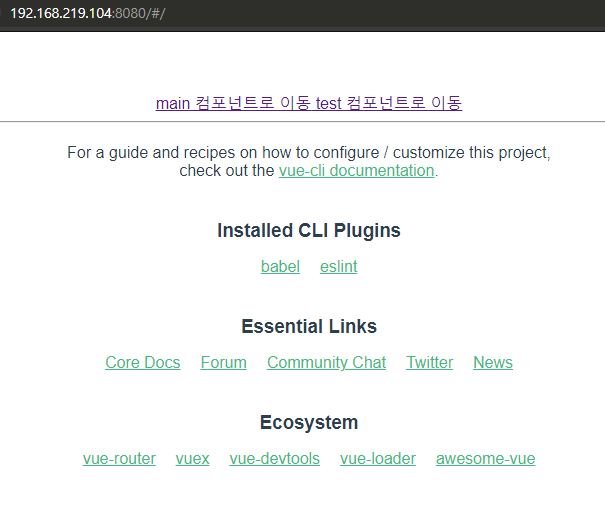
사이트를 확인하면 위와 같이 작동하는 것을 확인할 수 있다.
4. 히스토리모드
url을 확인하다 보면 중간에 /#/ 이 들어간 것을 확인 할 수 있다.
이것은 Vue.js의 모드는 기본 모드가 Hash 모드이다.
그로 인하여 중간에 #(Hash)가 들어간다.
Hash 와 History모드의 차이는?
- Hash mode
모든 URL을 Hash형태로 서비스한다.
URL이 변경될 때 페이지가 다시 로드 되지 않는다. - History mode
History 페이지를 다시 로드하지 않고 URL을 탐색할 수 있다. SPA의 단일 페이지 클라이언트앱이기 때문에 사용자가 직접 http://example.com/user/id 에 접속하면 404오류가 발생한다.
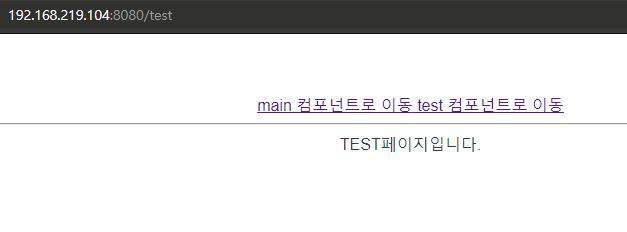
History모드를 사용하려면 Router의 옵션을 변경해주면 된다.
1
2
3
4
5
6
7
8
9
10
11
12
13
// src > router > index.js.

...

// 1-3. `routes` 옵션과 함께 router 인스턴스를 만들기.
const router = new VueRouter({
    // 3-1. mode를 수정한다.
    mode: 'history',
    routes // `routes: routes`의 줄임
})

...
모드를 수정하고 다시 접속하면 # 이 사라진 것을 확인할 수 있다.
5. 트랜지션 사용하기
router-view 는 동적인 컴포넌트으로써 상위에 transition 컴포넌트를 사용함으로써 트랜지션 효과를 적용할 수 있다.
<!-- app.vue -->
<template>
  <div id="app">
    <!-- 1-1. 라우터 view를 호출한다. -->
    <router-link to="/"> main 컴포넌트로 이동</router-link>
    <router-link to="/test"> test 컴포넌트로 이동 </router-link>
    <hr>
    <!-- <img alt="Vue logo" src="./assets/logo.png">
    <HelloWorld msg="Welcome to Your Vue.js App"/> -->
    <!-- 4-1. transition 컴포넌트 추가 -->
    <transition name="fade">
      <router-view />
    </transition>
  </div>
</template>

...

<style>
#app {
  font-family: Avenir, Helvetica, Arial, sans-serif;
  -webkit-font-smoothing: antialiased;
  -moz-osx-font-smoothing: grayscale;
  text-align: center;
  color: #2c3e50;
  margin-top: 60px;
}

/* 4-2. transition 스타일을 추가한다 */
.fade-enter-active, .fade-leave-active {
  transition: opacity 0.5s;
}
.fade-enter, .fade-leave-to {
  opacity: 0;
}
</style>
조금 더 동적으로 작동하는 것을 확인할 수 있다.
트랜지션의 경우 본인의 취향에 맞게 스타일을 변경하면 된다.